Configuration of Duo Security Proxy Server, Integration with WatchGuard Firewall, and Microsoft Remote Access Server
Scenario:
NicheITS recently was recently contracted by a client whom wanted a integrated solution to assist with updating compliance requirements for CMMC 2.0 combing their WatchGuard XTMV firewall, Microsoft Active Directory solution (AD) and Duo Security Multi-Factor Authentication (MFA) for staff VPN access meeting TLS 1.2+ and cipher encryption requirements.
Requirements:
- Leverages Windows 10+ VPN client.
- Pre login screen vpn connection ability to sync Active Directory passwords, Shared drives, and Group Policy Objects (GPO) on employee laptops and workstations.
- Windows VPN client connects to WatchGuard Firewall with IKEv2 leveraging SSL certificate.
- Users are required to authenticate with Duo two factor authentication push prior to DHCP address hand down.
- Leverage the detailed logging capabilities of the WatchGuard Firewall.
- Provide Network Address Translation for connecting devices.
- Disable dual tunneling capabilities.
- Ability to disconnect/lock users throughout the organizations internal and 3rd party cloud solutions with Active Directory.
Authentication Process:
- Client device connects to WatchGuard Firewall for Authentication.
- Watchguard makes request for user authentication back to Duo Proxy Server
- Duo Proxy makes authentication request to MS Radius Server which reads from the Network Policy Service (NPS) for Connection Policy requirements and Network Policy.
- If NPS Connection Request Policy meets requirements the NPS Server then the validated User is in approved group and active in Active Directory.
- Once validated against AD, the approved request goes to the Duo Proxy Server for MFA request back to the User mobile device app.
- Once MFA has approved push/code the Duo Proxy Server authenticates the user with the WatchGuard Firewall which than provides a VPN IP address for communication.
- VPN enabled on the Windows Login screen then pulls User GPO and Password Updates.
NIST 800-77 Guide to IPsec VPNs
https://nvlpubs.nist.gov/nistpubs/SpecialPublications/NIST.SP.800-77r1.pdf
NIST 800-53 Controls:
- AC-2: Account Management
- AC-3: Access Enforcement
- AC-4: Information Flow Enforcement
- AC-6: Least Privilege
- AC-18: Wireless Access
- AC-19: Access Control for Mobile Devices
- AC-20: Use of External Systems
- AT-2: Literacy Training and Awareness
- AT-3: Role-based Training
- AU-2: Event Logging
- AU-6: Audit Record Review, Analysis, and Reporting
- AU-12: Audit Record Generation
- AU-14: Session Audit
- CA-3: Information Exchange
- CM-10: Software Usage Restrictions
- IA-2: Identification and Authentication (organizational Users)
NIST 800-53 Controls:
- IA-3: Device Identification and Authentication
- IA-8: Identification and Authentication (non-organizational Users)
- MA-4: Nonlocal Maintenance
- PE-17: Alternate Work Site
- PL-2: System Security and Privacy Plans
- PL-4: Rules of Behavior
- PS-6: Access Agreements
- SC-7: Boundary Protection
- SC-8: Transmission Confidentiality and Integrity
- SC-10: Network Disconnect
- SC-12: Cryptographic Key Establishment and Management
- SC-13: Cryptographic Protection
- SC-23: Session Authenticity
- SI-4: System Monitoring
Install Microsoft Remote Access Service
Install Microsoft Remote Access Service 1
Dashboard, click Add roles and features.
Click Next three times to get to the server role selection screen.
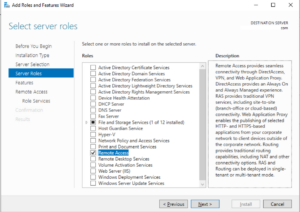
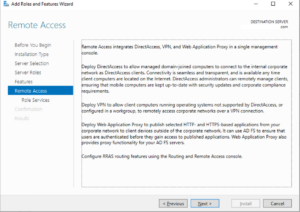
On the Select Server Roles dialog, select Remote Access, and then click Next.
Install Microsoft Remote Access Service 2
Click Next on Features. Nothing additional to add.
Install Microsoft Remote Access Service 3
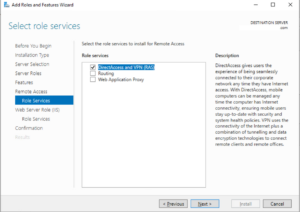
There are 3 options that you can leverage to deploy as part of your solution under Role Service:
- DirectAccess and VPN (RAS)
- Routing
- Web Application Proxy
For our deployment scenario were going to select DirectAccess and VPN (RAS) only. Since we will not require the Remote Access Server to provide NAT capabilities, as the Watchguard Firewall will facilitate this capability we will not require Routing capabilities.
We also do not require the Web Application Proxy
- On the Select role services dialog, select DirectAccess and VPN (RAS) and then click Next.
- Click Next, and then click Install.
- On the Installation progress dialog, verify that the installation was successful, and then click Close.
				The following Windows PowerShell cmdlet or cmdlets perform the same function as the preceding procedure. Enter each cmdlet on a single line, even though they may appear word-wrapped across several lines here because of formatting constraints.

Install-WindowsFeature RemoteAccess -IncludeManagementTools
Configure Self Signed Certificates in Microsoft Internet Information Services (IIS)
Step 1 Configure IIS Certificate
Self-Signed Certificate
Certificate authority (CA) signed certificates should be used for production systems, particularly if your deployment is going to be accessed from users outside your organization. In example, if your deployment is not behind your WatchGuard firewall (any Firewall) and accessible over the Internet, using a CA-signed certificate assures clients from outside your organization that the identity of the website has been verified.
Domain Certificates
If your deployment is located behind your WatchGuard Firewall and leveraging a CA-signed certificate is not possible, using a domain certificate is an acceptable solution. A domain certificate is an internal certificate signed by your organization's certificate authority. Leveraging a domain certificate assists in reducing the cost of issuing certificates and eases certificate deployment, since certificates can be generated quickly within your organization for trusted internal use.
Self-Signed Certificate Creation
In our instance, We need to create a self signed certificate or install a 3rd party public certificate in order to properly configure our setup. A public cert such as one from Digicert is preferred but a Self signed certificate will meet requirements as well. Creating a self signed certificate is pretty simple and straight forward.
Open the Internet Information Services (IIS) Manager under Administrative Tools.
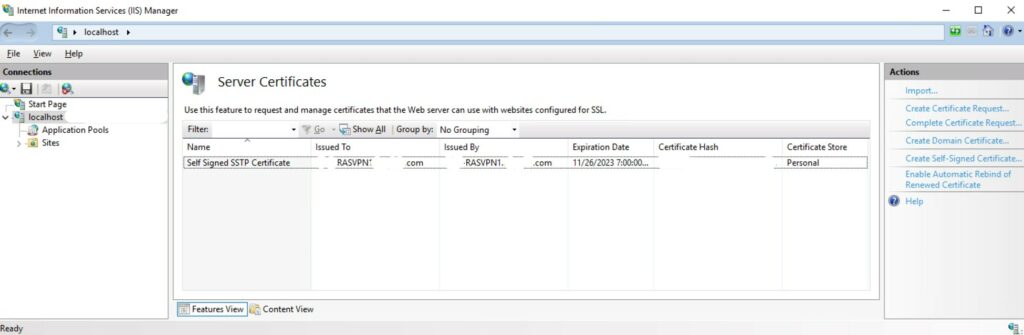
On the left side, highlight the root of the server under Start Page. Select Server Certificates which will define all installed server certificates.
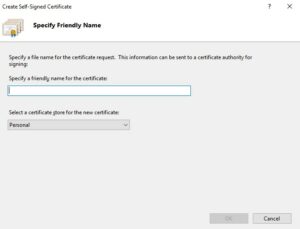
On the Create Self-Signed Certificate in the Actions column on the right side, select Create Self-Signed Certificate.
Step 2 Configure IIS Certificate
For the Self-Signed certificate creation select a friendly name for your certificate. This can be anything such as "Serveraname_SelfSigned_CreationDate" and then click OK to complete the process.
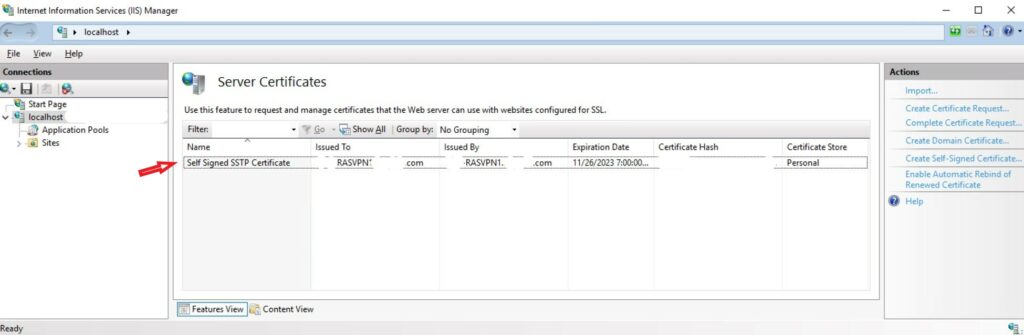
Step 3 Configure IIS Certificate
We can now see our Self Signed Certificate defined in the Server Certificates list.
Configure Routing and Remote Access
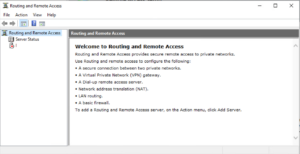
Configure Routing and Remote Access 1
Start by accessing the Routing and Remote Access Service under Administrative Tools and select the new start up wizard. Since we are essentially using the Microsoft RRAS service for just the RADIUS server service there isn't a great deal we need to configure but the basics here.
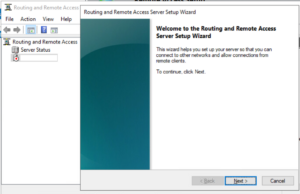
Configure Routing and Remote Access 2
Access the setup wizard.
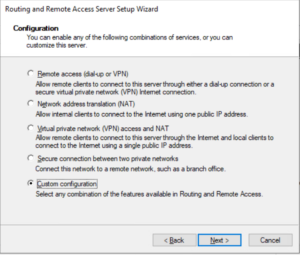
Configure Routing and Remote Access 3
Select Custom configuration as we do not need to configure any dial up or Network Address Translation (NAT) setups.
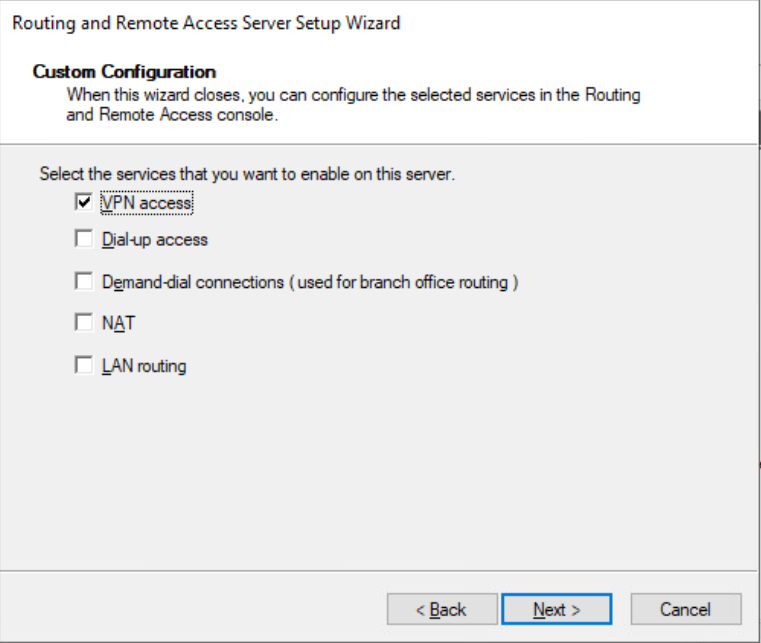
Configure Routing and Remote Access 4
Select VPN access and select Next.
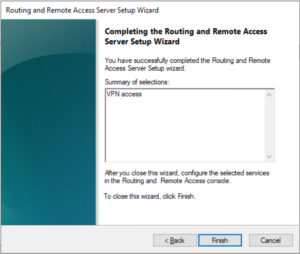
Configure Routing and Remote Access 5
Select Finish.
Configure Routing and Remote Access 6
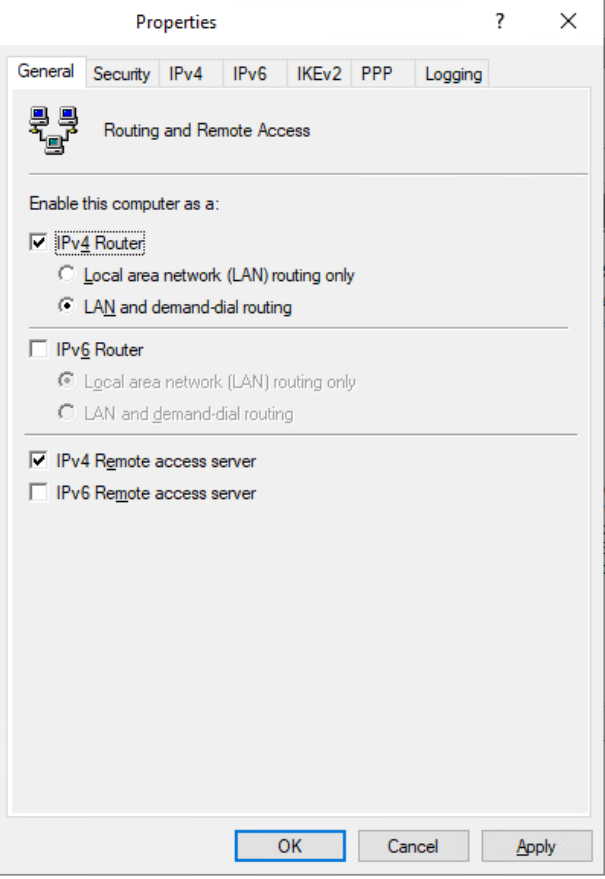
On our server instance right click and select Properties.
On the General tab select IPv4 Router and LAN and demand-dial routing.
We do not need in our instance IPv6 Router selected.
Select IPv4 Remote Access server.
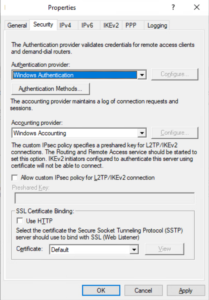
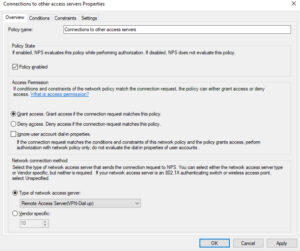
Configure Routing and Remote Access 7
Depending on if you have MS Remote Access Services already installed BUT did not have Network Policy Services installed you may/could see two different views on the Security tab under Properties. If you did not have Network Policy Services installed and just added it on. You would see this screenshot to the right. Here we would need to change the Authentication Provider to Radius Server from Windows Authentication.
Additionally change the Accounting Provider from Windows Authentication to Radius Authentication as well.
Select Authentication Methods and move to the next step.
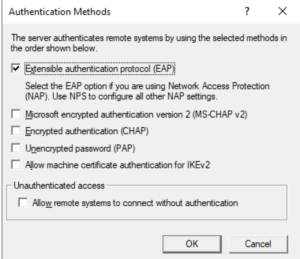
Configure Routing and Remote Access 8
Under Authentication methods select Extensible authentication protocol (EAP) and select OK.
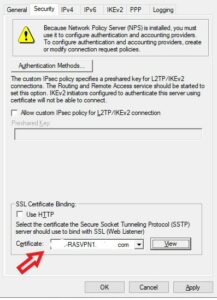
Configure Routing and Remote Access 9
Now under the Security tab, at the bottom, if you do not see your recently created IIS Self-Signed certificate automatically defined go ahead and select the down arrow and select your certificate.
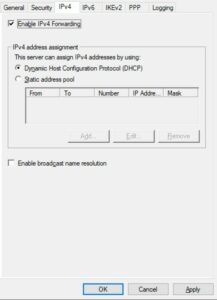
Configure Routing and Remote Access 10
Under IPv4 you can accept the defaults. The WatchGuard Firewall will be handling DHCP requests and DNS resolution so no additional configuration is needed here.
Configure Routing and Remote Access 11
We do not need to configure anything under IPv6.
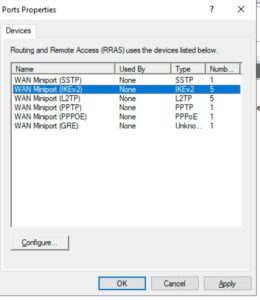
Under IKEv2 we do not need to configure anything additional.
Under PPP there is nothing additional that requires configuration.
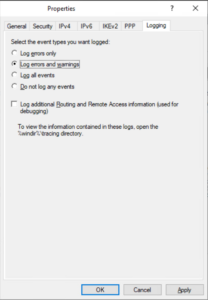
Under Logging you can select the level of logging you deem is required. During deployment it maybe recommended to select the highest logging level in case of initial configuration.
Configure Routing and Remote Access 12
For security hardening, since we technically do not require any of these connection types lets go ahead and configure each one and de-select:
- Remote access connections (inbound only)
- Demand-dial routing connections (inbound and outbound)
- Maximum ports 1
At this point were completed on configuration requirements for the Routing and Remote Access Service.
Create Active Directory Security Group
Create AD Security Group 1
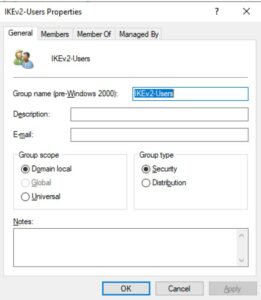
Create user group in Active Directory that corresponds to the VPN type of User group that is created by the WatchGuard firewall when enabling VPN types. In our example we are enabling IKEv2, therefore we are creating a Security group with the same name.
Create AD Security Group 2

Configure Network Policy Service
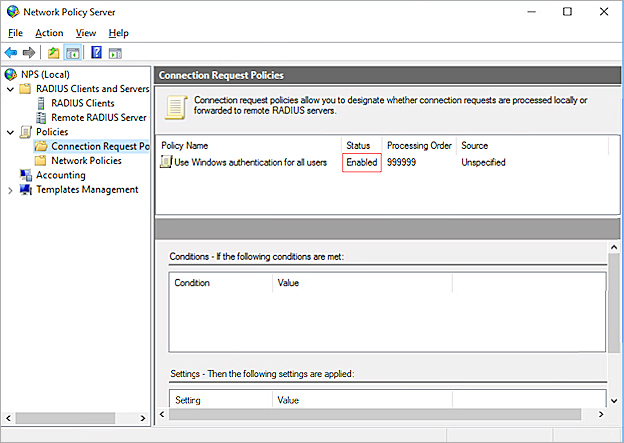
Configure Network Policy Service 1
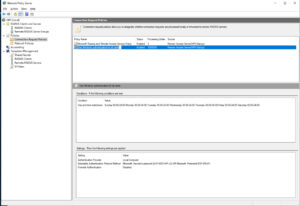
Start with configuration by "Enabling" the Connection Request Policies by going to Policies > Connection Request Policies and Enable the "Use Windows Authentication for All users" policy.
Users can employ stricter requirements on this policy, though for a majority of organizations this one policy will meet requirements.
Configure Network Policy Service 2
Next lets create a new Network Policies policy and customize it for the requirements.
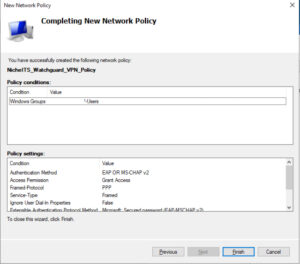
Configure Network Policy Service 3
Configure Network Policy Service 4
Add WG Firewall As A Radius Client
Configure WatchGuard Firewall Radius Client
Configure Watchguard Firewall 1
About Mobile VPN with IKEv2 User Authentication
When you configure Mobile VPN with IKEv2, select authentication servers, select users and groups for authentication. The users and groups you specify must exist on the selected authentication server.
Mobile VPN with IKEv2 supports two authentication methods:
- Local authentication on the Firebox (Firebox-DB)
- You can use the local authentication server on the Firebox for IKEv2 user authentication. If you use Firebox-DB for authentication, you must use the IKEv2-Users group that is created by default when you configure Mobile VPN with IKEv2. You can also add other users and groups in the IKEv2 configuration. The users and groups you add to the IKEv2 configuration are automatically included in the IKEv2-Users group.
Microsoft RADIUS Server (Or any other)
For our deployment scenario we're going to leverage our recently configured MS Routing and Remote Access server RADIUS server for IKEv2 user authentication. If you use a RADIUS server for authentication, you can use the default IKEv2 -Users group (if you also add that group on the RADIUS authentication server), or you can add the names of users and groups that exist in the RADIUS authentication server database.
If you want to use an Active Directory database for authentication, you can configure your RADIUS server to use the Active Directory database. Then you can configure the RADIUS server on the Firebox, select RADIUS as the authentication method for Mobile VPN with IKEv2, and add the users and groups from your Active Directory database to the Mobile VPN with IKEv2 configuration. To configure your Active Directory server, see the documentation for your Microsoft operating system.
Configure Watchguard Firewall 2
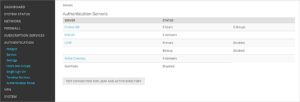
RADIUS (Remote Authentication Dial-In User Service) authenticates the local and remote users on a company network. RADIUS is a client/server system that keeps the authentication information for users, remote access servers, VPN gateways, and other resources in one central database.
Go ahead and Select RADIUS from the servers page.
Select ADD.
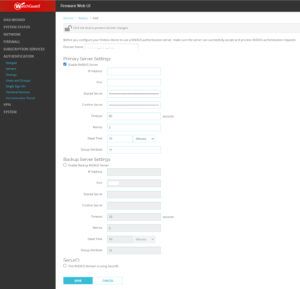
Configure your domain name.
- Under the Primary Server Settings input the IP address of your Duo Proxy Services server.
- Keep port 1812.
- Timeout 15 seconds though you may want to increase this to 30 seconds if you have clients logging in from known slower connection locations.
- Keep retries at 3.
- Dead Time to 10 minutes.
- Group Attribute to 11.
- and Shared Secret.
- Select SAVE.
Add the Firebox as a RADIUS Client 1
Add the Firebox as a RADIUS Client 2
Configure IKEv2 on WatchGuard Firewall
WatchGuard Notes:
Virtual IP address pools do not affect whether VPN users are considered as trusted users on the local network. For example, if you specify an IP address pool for Mobile VPN with IKEv2 that overlaps with the IP address range of your local network, mobile VPN users are still not considered as trusted users on the local network.
WatchGuard Recommended Best Practices for IKEv2 Policies
We recommend that you limit which network resources Mobile VPN with IKEv2 users can access through the VPN. To do this, you can replace the Allow IKEv2-Users policy.
To replace the Allow IKEv2-Users policy:
- Determine the ports and protocols your users require. To determine this, assess your network with baseline tests and view logs.
- Add Mobile VPN with IKEv2 groups and users to existing Firebox polices that specify those ports and protocols. For example, you can add Mobile VPN with IKEv2 groups and users to policies for web traffic.
- If required, add new policies:
- When you select a policy type for the new policy, you can specify a protocol and port.
- In the From list of the policy, specify users or groups. You must specify groups or users included in the Mobile VPN with IKEv2 configuration. For example, you can specify the default IKEv2-Users group. Or, specify groups and users that you added to the Mobile VPN with IKEv2 configuration.
- In the To list of the policy, remove the Any alias and add other destinations.
- Before you disable the Allow IKEv2-Users policy, make sure your policies allow Mobile VPN with IKEv2 users to access all required network resources.
- Disable the Allow IKEv2-Users policy.
StrongSwan Guidance Statements:
Attacks on IKEv2 PSK Authentication
If user credentials don’t have enough entropy what is usually the case if you let the users freely choose their passwords, then PSK-based IKEv2 authentication is vulnerable to active Man-In-The-Middle (MITM) attacks.
Since a VPN client is usually the IKEv2 initiator, it sends its AUTH payload containing the password hash in the IKE_AUTH request to an unauthenticated and thus untrusted VPN server. If an attacker inserts herself into the IKE connection between client and server she can intercept the AUTH payload and start an offline dictionary or brute force attack on the PSK.
Thus it is of utmost importance that cryptographically strong PSKs are used with PSK-based authentication. Since in most cases this cannot be enforced, we highly recommend to use EAP-based authentication instead where the VPN server is authenticated first based on a X.509 server certificate, so that the VPN client can then send its [potentially weak] password hash later on to a trusted peer.
Certificate-based Authentication
Certificate-based authentication is inherently stronger than PSK-based authentication. A properly built PKI architecture has usually one root CA and one or several intermediate CAs, where the private key of the intermediate CA is used to sign the end entity certificates and the private key of the root CA can be kept on a smartcard stored in a safe or at lease on a system disconnected from the Internet. The private root CA key is never stored on an insecure or online system. Securing the root CA enables the PKI administrator to revoke any certificates and recreate the PKI from scratch, if any intermediate CAs are compromised.
Using the default revocation plugin, Certificate Revocation Lists (CRLs) and the Online Certificate Status Protocol (OCSP) can be used to check if a given certificate has been revoked for some reason. strongSwan supports locally-stored CRLs, as well as fetching fresh CRLs and OCSP information via the fetcher plugins curl, soup or winhttp.
CRL Distribution Points (CDPs) are either retrieved from the certificate or can be added manually using an authorities section in swanctl.conf.
X.509 certificates should be based on RSA public keys with a modulus of at least 2048 bits (preferably 3072 bits for end entity certificates and 4096 bits for CA certificates). Alternatively ECDSA public keys with at least 256 bits (preferably 384 bits) can be used. For certificate signatures at least SHA-256 must be used since both SHA-1 and MD5 are hopelessly broken. All X.509 certificates must conform to the PKIX Internet standard (RFC 5280).
Perfect Forward Secrecy
Perfect Forward Secrecy (PFS) is strongly recommended to make IPsec peers negotiate an independent session key for each IPsec or CHILD SA. This protects the long-term confidentiality of the IPsec traffic if the IKE shared secret is leaked. Note that the session keys of the first CHILD_SA of a new IKEv2 connection are derived from the IKE shared secret. However, subsequent CHILD_SAs will use independent keys if PFS is used.
PFS is enabled by appending a DH group to the ESP or AH cipher proposal. Using PFS introduces no significant performance overhead, unless you rekey more than about 80 CHILD_SAs per second.
Configure IKEv2 1
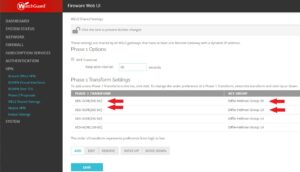
Start IKEv2 Configuration by defining our Phase 1 options.
Start by going to VPN on the left side WatchGuard web client. Then select IKEv2 Shared Settings.
Then select Configure under Phase 1 Transforms. Configure settings recommended for organizations that require strong encryption. Organization that are, or perhaps looking for specific recommendations standards whom maybe engaged with CMMC 2.0, FedRAMP or other requirements meeting Department of Defense and/or Civilian agencies can look down under references for additional information.
We are configuring AES-GCM(256bit) With Diffie-Hellman Group 20, another configuration for Group 19 which aligns with recommendations.
(Refer to the VPN Encryption References and Guidance documented below.)
Configure IKEv2 2
Next move on to the configuration of the VPN client will include additional steps on configuring of the types of Phase 1 Transforms and Phase 2.
Lets start by going to VPN on the left side WatchGuard web client. Then select Mobile VPN, then select Configure under IKEv2.
Configure IKEv2 3
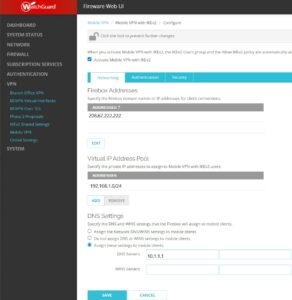
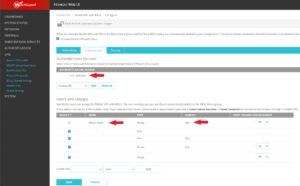
Check the Activate Mobile VPN with IKEv2.
Under Firebox Addresses, Edit and enter in the External/Public IP adddress(es) that you will use for your clients to connect too.
Under the Virtual IP Address Pool, enter in the IP's and or subnet that the Firebox will provide as DHCP addresses to connecting clients. This configuration essentially provides the NAT translation for connecting clients.
By leveraging the WatchGuard firewall as the connection point for VPN clients and not the actual Microsoft RRAS server is administrators can benefit from the drastically enhanced capabilities of the WatchGuard diagnostics and logging.
Under DNS Settings select the option which works best for your origination. If your network is fairly basic and does not employ various VLANS and other network services you can get away with Assign the Network DNS/WINS settings to mobile clients. If you would like to provide custom DNS configurations to mobile clients you can go ahead and input it here.
Configure IKEv2 4
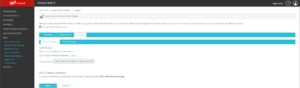
Move next to the Authentication Tab under Configuration.
You want to add the domain name that you configured earlier when configuring the Radius Client under Authentication --> Servers --> RADIUS.
You can additionally include the Firebox-DB and local user setup, though these local WatchGuard firewall users will not leverage the DUO MFA authentication. Local users will essentially bypass DUO MFA.
Under Users and Groups you will see the default user group IKEV2-Users.
You will also be required to define the individual users that will be authenticating.
Configure IKEv2 5
Move next to the Phase 1 Settings tab, under the Security Tab under Configuration.
You can keep the WatchGuard Self-Signed Certificate here. This certificate will be used to deploy to mobile clients.
Configure IKEv2 6
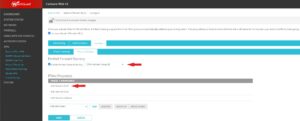
Move next to the Phase 2 Settings tab, under the Security Tab under Configuration.
Here is where administrators can configure the level of authentication requirements for clients to connect.
Based on guidance from the NSA U/OO/148260-20 | PP-20-0712 | October 2020 ver. 1.2, we are configuring Phase 2 requirements with:
- ESP-AES256-GCM DH Group 20
- ESP-AES256-GCM DH Group 19
VPN Encryption References and Guidance:
- https://www.watchguard.com/help/docs/help-center/en-US/Content/en-US/Fireware/mvpn/general/ipsec_algorithms_protocols_c.html
- https://media.defense.gov/2021/Sep/16/2002855928/-1/-1/0/CONFIGURING_IPSEC_VIRTUAL_PRIVATE_NETWORKS_2020_07_01_FINAL_RELEASE.PDF
- https://nvlpubs.nist.gov/nistpubs/SpecialPublications/NIST.SP.800-77r1.pdf
- https://www.ncsc.gov.uk/guidance/using-ipsec-protect-data
- https://docs.strongswan.org/docs/5.9/howtos/securityRecommendations.html
Microsoft Azure VPN References:
- https://learn.microsoft.com/en-us/azure/vpn-gateway/vpn-gateway-about-compliance-crypto
AWS VPN References:
- https://aws.amazon.com/about-aws/whats-new/2020/08/aws-site-to-site-vpn-now-supports-additional-encryption-integrity-key-exchange-algorithms/
- https://aws.amazon.com/premiumsupport/knowledge-center/vpn-tunnel-phase-2-ipsec/
- https://aws.amazon.com/vpn/faqs/
Duo Security Proxy Server Install
1

2
SSL Certificate Deployment
Windows 10/11 VPN Notes:
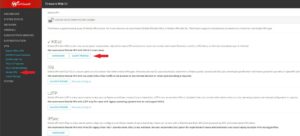
For deployment on client end points there are 3 primary components that require deployment.
- The WatchGuard Firewall Self-Signed Certificate that you pull down from the WatchGuard VPN IKEv2. This certificate is bundled in a .TGZ file that can be individually deployed on machines or included in a Group Policy Object in Active Directory. For simplicity, and any updates, deployment in Group Policy is recommended.
- Custom Powershell configuration required to create the VPN connection and set firewall standards. By Default Microsoft leverages the lowest, oldest, poorest VPN configuration settings unless specifically defined.
- Self Signed certificate from the Microsoft Remote Routing and Access Server. This certificate can be individually deployed on machines or included in a Group Policy Object in Active Directory. For simplicity, and any updates, deployment in Group Policy is recommended.
WatchGuard VPN Config File README.txt:
Configure an IKEv2 VPN Connection to a WatchGuard Firebox
=========================================================
You can use the files in this package to automatically create a new IKEv2 VPN profile on devices with supported versions of Windows, macOS, iOS, or Android. You can also manually configure an IKEv2 VPN profile on your device. If you manually configure a VPN profile, you must install the rootca.pem or rootca.crt certificate included in the same folder as this README file.
For configuration instructions specific to your operating system, see the README.txt files in these folders:
* Windows_8.1_10_11
* MacOS_iOS
* Android
For operating system support information, see the Operating System Compatibility Matrix in the Fireware Release Notes at https://www.watchguard.com/wgrd-help/documentation/release-notes/fireware.
For online versions of IKEv2 VPN client configuration instructions, see these topics in Fireware Help:
Windows 8.1, Windows 10 and Windows 11:
https://www.watchguard.com/help/docs/help-center/en-US/Content/en-US/Fireware/mvpn/ikev2/mvpn_ikev2_windows_client.html
macOS and iOS:
https://www.watchguard.com/help/docs/help-center/en-US/Content/en-US/Fireware/mvpn/ikev2/mvpn_ikev2_mac_client.html
Android (with the strongSwan app):
https://www.watchguard.com/help/docs/help-center/en-US/Content/en-US/Fireware/mvpn/ikev2/mvpn_ikev2_android_client.html
References:
- https://www.watchguard.com/help/docs/help-center/en-US/Content/en-US/Fireware/mvpn/ikev2/mvpn_ikev2_windows_client.html
Deployment With Active Directory Group Policy
Deployment with AD Group Policy 1
Deployment using Active Directory Group Policy.
Deployment through GPO's is the preferred method and is pretty simple.
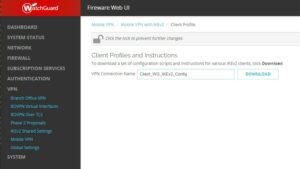
Download the WatchGuard client configuration file by first going into your WatchGuard administrative portal and go to VPN --> Mobile VPN
Deployment with AD Group Policy 2
Enter in a name for the download file and download to your local machine.
Deployment with AD Group Policy 3
Using Winzip or another program you want to extract the two cert files name rootca.crt and rootca.pem
Rename these to better identify them such as "WatchGuard_Rootca.crt"
Copy and Paste these over to your Active Directory server to buildout the Group Policy Object

Deployment with AD Group Policy 4
We now need to extract the Remote Access server IIS Self-Signed Certificate as well.
Goto the IIS manager -->on the left select the root of your server and go to the Server Certificates Icon.
You then want to select on your created Self Signed certificate and on the right select Export
The Export wizard will ask you to create a location to save and a password. A password is not required but is recommended.
Once Exported you will need to copy and paste this file over to the Domain Controller Group Policy Manager and import this into a GPO along with your WatchGuard Cert as well.

Deployment with AD Group Policy 5
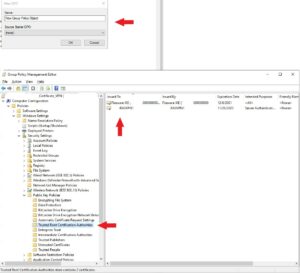
Once in Group Policy Manager you want to create a new GPO.
Provide a name such as, Example: "Domainname_Certificates_VPN_Deployment"
Goto:
Computer Configuration --> Windows Settings -->Security Settings -->Public Key Policies --> Trusted Root Certification Authorities and import you WatchGuard and RRAS IIS Self Signed Certificates.
Once correctly uploaded you will see the instances defined.
Deploy the Group Policy into the root domain or Organizational Unit (OU) you have defined for your employees whom require VPN accessibility.
Note:
The Certificates will need to be deployed on the machines prior to getting the VPN on the client end point up and going. Meaning that updating or deploying this process while laptops are already in the field will need the ability to either manually install the certificates or still need a method of doing a "gpupdate /force" while connected to the domain either onsite at a office or some other method.
For laptops already in the field, administrators may need a temporary connection method at the login screen in order to pull down GPO's, and password updates.
Step 1 Deploy Without Group Policy
Step 2 Deploy Without Group Policy